最近はいろいろなPCパーツを買うことが多く、ちょうどSSDがひとつ余った。もったいないので自宅サーバ用に使うことにした。
 ←余りもの。ADATAの新しいTLC。初期MLCモデルは突然死が多かった。
普段ならESXiでOSごと仮想イメージコピーするのだが、せっかく新しいSSDを使うなら、OSも新しいものにリニューアルしてはどうかと思った。
CentOS6のEOLは2020-11-30らしい。あと三年あるものの、三年後古くなったSSDにCentOS7をいれるのは気が乗らない。どうせなら今のうちにCentOS7にしてしまって、SSDの寿命ギリギリまでがんばってもらいたい。
SSDの速度を活かせるサーバといえば、やはりWebサーバではなかろうか。この備忘録はWordpressで動いているので、データをまるごと移すことになる。
移行用のプラグインはよくわからないし、うまく動かない報告も散見され、使うのに二の足を踏んでしまう。IT業界にいたとき、クリティカルなサーバのOSアップデートは、新サーバにOSインストール→(コマンドを用いての)データコピーなケースが多かった。ここはやはりプロが信頼するやり方を採用しようとおもう。まるごとコピーといってもdumpをとったりtarに圧縮したりいろいろするので、そこのやり方を記録しておく。
[CentOS6]旧サーバでの作業
|
1 |
ここでは各ファイルのバックアップをとり、それを新サーバに送っておく。 |
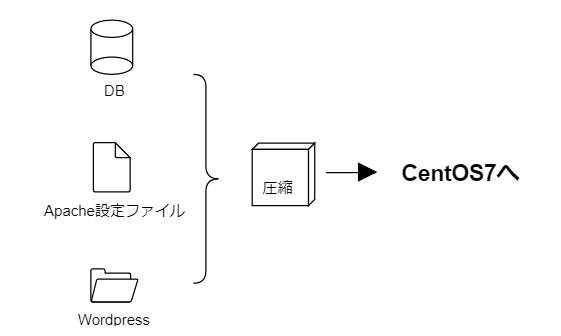
wordpressのDB名と接続情報を確認する。
|
1 2 3 4 5 6 7 8 9 10 11 12 13 14 |
cd /var/www/wordpress cat wp-config.php /** WordPress のためのデータベース名 */ define('DB_NAME', 'wordpress_db'); /** MySQL データベースのユーザー名 */ define('DB_USER', 'wordpress_user'); /** MySQL データベースのパスワード */ define('DB_PASSWORD', 'password'); /** MySQL のホスト名 */ define('DB_HOST', 'localhost'); |
DBをバックアップする。
|
1 |
mysqldump -p wordpress_db -u wordpress_user -h localhost > /tmp/wp_data |
wordpressをバックアップする。
|
1 |
tar cfvz /tmp/wordpress.tar.gz /var/www/wordpress |
Apacheの設定ファイルをバックアップする。
|
1 2 |
cd /etc/httpd/conf.d/ tar cfvz /tmp/rite.conf.tar.gz rite.conf |
まとめて新サーバに送ろう。
|
1 |
scp /tmp/rite.conf.tar.gz /tmp/wordpress.tar.gz /tmp/wp_data 192.168.0.4:/tmp |
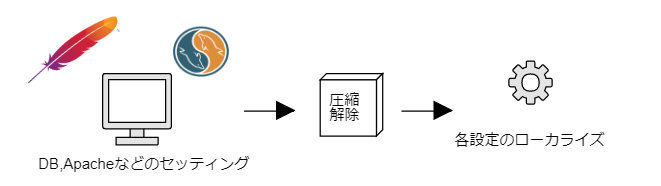
[CentOS7] 新サーバでの作業
|
1 2 |
新サーバにwordpressを構築するための準備をする。準備ができたら、旧サーバから送ったバックアップを用いて wordpressをまるごと復元する。 |
mysqlを使うための準備。
|
1 |
rpm -ivh http://dev.mysql.com/get/mysql57-community-release-el7-8.noarch.rpm |
yumにてwordpressを動かすのに必要なものを入れる。
|
1 |
yum install httpd mysql-community-server mysql-server php php-mysql php-mbstring |
mysqlの起動と自動起動。
|
1 2 |
systemctl start mysqld.service systemctl enable mysqld.service |
mysqlの初回起動時にランダムパスワードが生成されるので、確認する。
|
1 2 |
cat /var/log/mysqld.log | grep pass 2017-09-01T01:46:00.522685Z 1 [Note] A temporary password is generated for root@localhost: _t#VNBB9p<(R |
mysqlの初期設定を行う。
|
1 2 3 4 5 6 7 8 9 10 11 12 13 14 15 16 17 18 19 20 21 22 23 24 25 26 27 28 29 30 31 32 33 34 35 36 37 38 39 40 41 42 43 44 45 46 47 48 49 50 51 52 53 54 55 56 57 58 59 60 |
mysql_secure_installation Securing the MySQL server deployment. Enter password for user root: The existing password for the user account root has expired. Please set a new password. New password: # 大文字小文字記号混在 Re-enter new password: The 'validate_password' plugin is installed on the server. The subsequent steps will run with the existing configuration of the plugin. Using existing password for root. Estimated strength of the password: 100 Change the password for root ? ((Press y|Y for Yes, any other key for No) : y New password: Re-enter new password: Estimated strength of the password: 100 Do you wish to continue with the password provided?(Press y|Y for Yes, any other key for No) : y By default, a MySQL installation has an anonymous user, allowing anyone to log into MySQL without having to have a user account created for them. This is intended only for testing, and to make the installation go a bit smoother. You should remove them before moving into a production environment. Remove anonymous users? (Press y|Y for Yes, any other key for No) : y Success. Normally, root should only be allowed to connect from 'localhost'. This ensures that someone cannot guess at the root password from the network. Disallow root login remotely? (Press y|Y for Yes, any other key for No) : y Success. By default, MySQL comes with a database named 'test' that anyone can access. This is also intended only for testing, and should be removed before moving into a production environment. Remove test database and access to it? (Press y|Y for Yes, any other key for No) : y - Dropping test database... Success. - Removing privileges on test database... Success. Reloading the privilege tables will ensure that all changes made so far will take effect immediately. Reload privilege tables now? (Press y|Y for Yes, any other key for No) : y Success. All done! |
wordpress用のデータベースを作る。
|
1 2 3 4 5 6 7 8 |
mysql -u root -p Enter password: # 新しいパスワードを入力 CREATE DATABASE wordpress_db DEFAULT CHARACTER SET UTF8 DEFAULT COLLATE UTF8_GENERAL_CI; CREATE USER 'wordpress_user'@'localhost' IDENTIFIED BY 'new_password'; GRANT ALL PRIVILEGES ON wordpress_db.* TO 'wordpress_user'@'localhost'; |
wordpress用のデータをバックアップから入れる。
|
1 |
mysql -h localhost -u wordpress_user -p wordpress_db < /tmp/wp_data |
wordpressのコンテンツファイルを復元。
|
1 2 3 4 5 6 7 8 9 |
cd /tmp tar xvfs /tmp/wordpress.tar.gz mv /tmp/var/www/wordpress /var/html/ cd /var/www/wordpress vi wp-config.php /** MySQL データベースのパスワード */ define('DB_PASSWORD', 'new_password'); #パスワードを確認して修正する。 |
Apacheの設定ファイルを復元。Apacheの再起動で完成。
|
1 2 3 4 5 6 7 |
tar xvfs /tmp/rite.conf.tar.gz mv /tmp/rite.conf /etc/conf.d/ apachectl configtest systemctl restart httpd |